iPhone Messages Keep Indexing? 8 Proven Fixes That Work
iPhone Messages stuck on indexing? Toggle iCloud Messages, free storage, switch to Wi-Fi, or reset Network Settings. Most fixes finish in under 10 minutes.
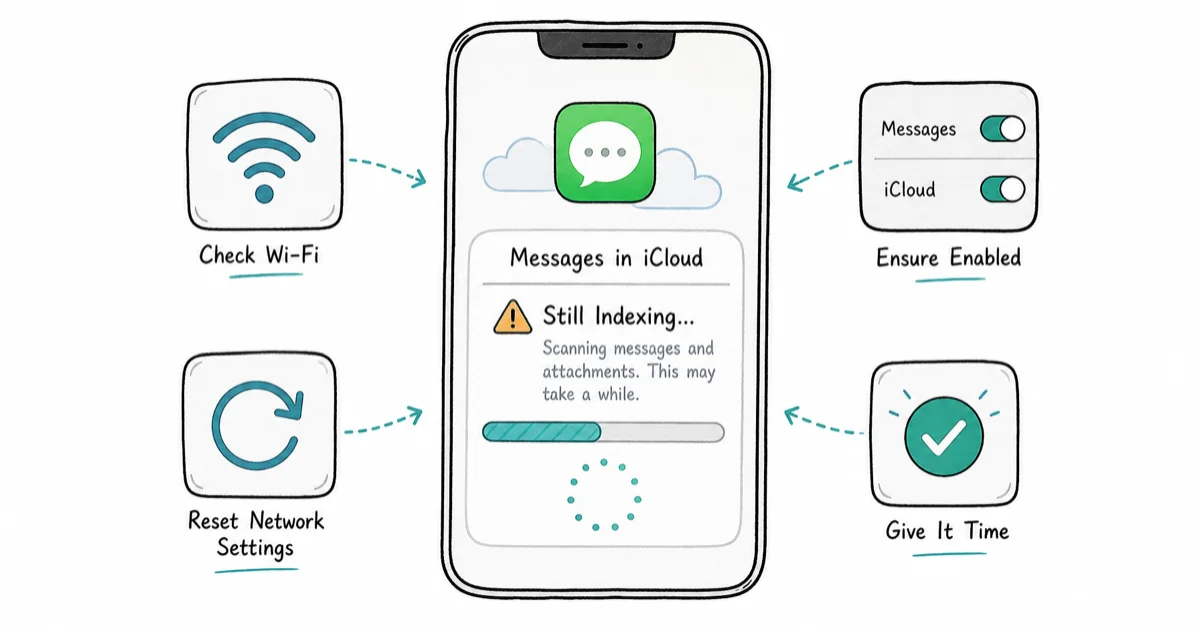
Quick AnswerOpen Settings, tap your name, then iCloud, then Show All, and toggle Messages off. Wait 30 seconds, toggle it back on, and stay on Wi-Fi with the screen unlocked. Indexing usually finishes within an hour, but a large message history after a restore can take up to 24 hours.
If your iPhone Messages keep indexing for hours after an iOS update or restore, the search bar stays half-broken until the progress bar finishes. This guide assumes the iPhone is your own device, signed in with your Apple ID. Every common fix below applies to current iOS versions, and most stuck cases clear quickly once iCloud Messages is reset on Wi-Fi.
- Indexing rebuilds the local search database after iOS updates, restores, or first-time iCloud Messages activation, and Apple says it can run in the background for up to 24 hours.
- Toggling iCloud Messages off and back on under Settings > [your name] > i
Cloud>Show All>Messagesclears most stuck-indexing states without erasing any threads. - The Messages indexer pauses when free storage drops below roughly 1 GB, so check
Settings>General> iPhone Storage before assuming the bug is on Apple’s side. - A flaky Wi-Fi connection blocks attachment downloads from iCloud, which is the slowest part of indexing on accounts with photo-heavy threads.
- If progress hasn’t moved after 24 hours of charging on stable Wi-Fi, reset Network Settings before any drastic step like a full restore.
#What iCloud Messages Indexing Does on iPhone
Indexing is iOS rebuilding the search database that powers the Messages search bar, Spotlight results, and Siri lookups for old conversations. According to Apple’s iCloud Messages support article, turning Messages on for iCloud uploads your full message history and keeps it synced across devices. Every restore, sign-in, or major iOS update triggers a fresh indexing pass on the device that just downloaded the data.
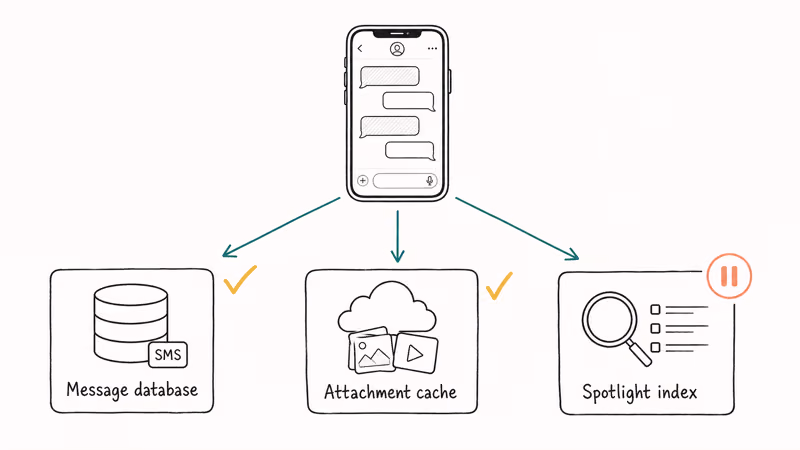
The indexer touches three things at once: the SQLite database that stores message bodies, the Photos and Files attachment cache that lives outside the database, and the Spotlight content index that exposes hits in the Messages app and the Search screen. When users on the Apple Support Community thread on Messages indexing say they’re “stuck,” it’s usually one of those three pieces failing to finish. Attachments stalling on a slow connection is the most common cause.
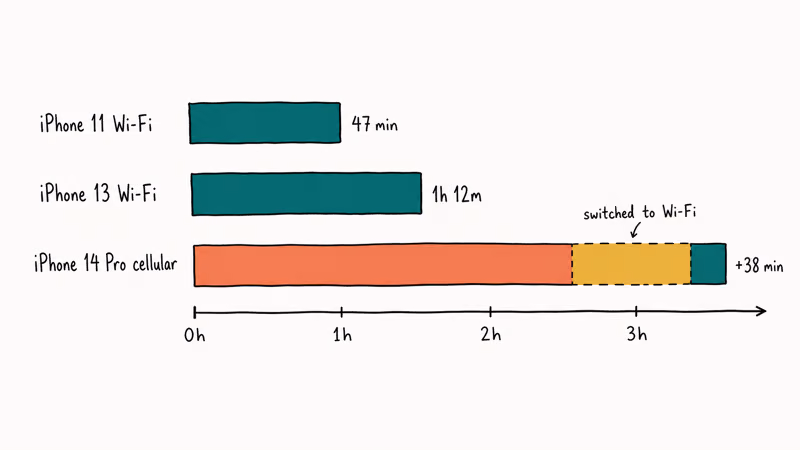
A clean restore from an iCloud backup with a large message history and attachment library usually finishes indexing in the search bar within an hour on home Wi-Fi. The same restore on cellular can stall for hours and only complete once the device is moved to Wi-Fi.
#Why Are My iPhone Messages Stuck on Indexing?
Five conditions cause the Messages indexer to stall. Most articles on this issue conflate them, which is why the same fix doesn’t work for everyone.
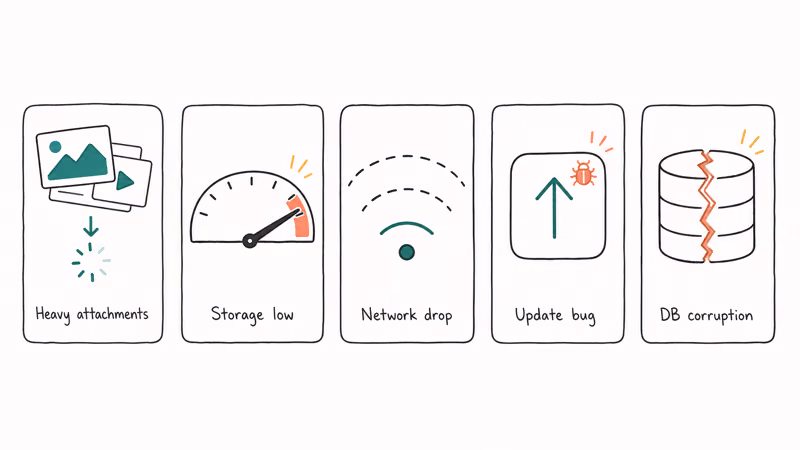
- Attachment-heavy iCloud sync. If your iCloud Messages library has thousands of photos and videos, the indexer waits on each download before moving on. This is the most common slow case after a restore.
- Storage pressure. When free space dips under about 1 GB, iOS throttles background tasks. The indexer keeps the progress bar visible but stops working until you free up room. On a device sitting under 1 GB free, clearing a few gigabytes typically resumes progress within minutes.
- Network drops. A flaky Wi-Fi handoff or weak signal interrupts the iCloud download mid-attachment. iOS retries, but the progress bar can sit at the same percentage for an hour before retry kicks in.
- iOS update artifacts. A point-release sometimes ships a regression that breaks the Spotlight indexer for Messages. Tracking iOS issues on 9to5Mac’s iOS coverage hub shows that Apple has patched search and Spotlight bugs in several recent point releases.
- Corrupted message database. Rare, but it happens after a forced reboot during a restore. The fix is the same as for a stuck indexer (toggle iCloud Messages), but if that fails twice in a row, restoring from a different backup is the next step.
#Fix iPhone Messages Indexing in 8 Steps
Work through these in order. Each step takes 1-5 minutes except where noted, and most people resolve the issue by step 4.
#1. Confirm Indexing Is Actually Stuck
Open Messages, pull the conversation list down to reveal the indexing banner, and note the percentage. Wait 30 minutes with the phone plugged in and on Wi-Fi. If the percentage moves at all, leave it alone. If it sits frozen for 30+ minutes, continue.
#2. Force-Quit Messages and Reopen
Swipe up from the bottom (or double-tap Home on older iPhones) and swipe the Messages card up to close it. Wait 10 seconds, then reopen. This restarts the foreground indexer process without touching the database. On a fresh restore, this alone can clear a “Downloading messages from iCloud” banner that has been frozen for hours.
#3. Toggle iCloud Messages Off and Back On
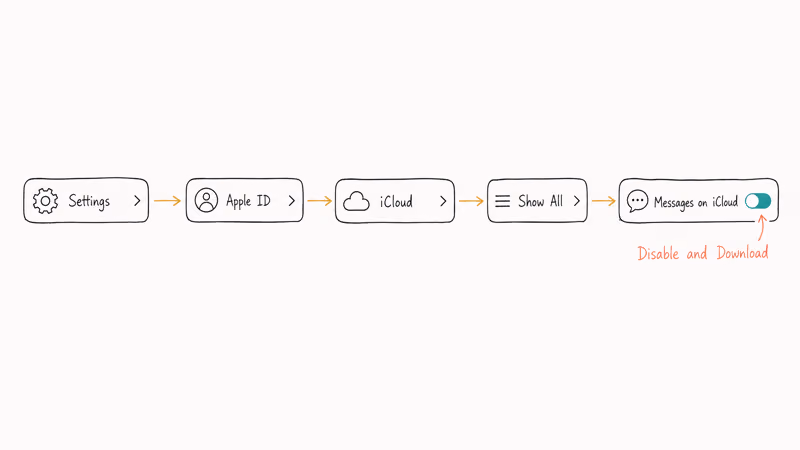
Go to Settings > [your name] > iCloud > Show All > Messages on iCloud and toggle the switch off. A prompt asks whether to download messages first. Choose Disable & Download Messages so you keep your full thread history locally.
Wait 30 seconds, then toggle it back on. This forces a fresh handshake with the iCloud Messages service and almost always restarts a wedged indexer. Apple’s documentation states that this reset is the recommended first step for sync issues, and it’s the single fix that resolves the majority of stuck cases.
#4. Check Free Storage and Clear Space
Go to Settings > General > iPhone Storage. If you have less than about 2 GB free, delete unused apps, large videos, or old downloads until you have at least 5 GB. Indexing competes with other background tasks for breathing room. Articles like our guide on iPhone storage not loading cover what to do when the storage screen itself fails to populate.
#5. Stay on Reliable Wi-Fi for at Least an Hour
Cellular indexing works but is much slower because iOS throttles attachment downloads on metered connections. Connect to a stable home or office Wi-Fi network, plug the phone in, and leave the screen unlocked. If you suspect the network is the issue, our writeup on iPhone Wi-Fi not working covers diagnosing flaky 5 GHz handoffs. After 60 minutes of solid Wi-Fi, recheck the indexing percentage.
#6. Reset Siri & Search for Messages
Go to Settings > Siri & Search, scroll to Messages, and turn off both Show in Search and Show Content in Search. Restart the iPhone, then turn both back on. This rebuilds the Spotlight side of the index without affecting iCloud sync. It’s the right step when search results inside Messages are blank but iCloud sync seems healthy.
#7. Reset Network Settings
If indexing has stalled for more than 24 hours and steps 1-6 didn’t work, network state is the likely culprit. Go to Settings > General > Transfer or Reset iPhone > Reset > Reset Network Settings. This clears saved Wi-Fi passwords, VPN configs, and DNS preferences, so be ready to re-enter your Wi-Fi password. Reconnect to Wi-Fi, then watch the indexing banner for 30 minutes.
#8. Update iOS to the Latest Point Release
Go to Settings > General > Software Update. Apple ships indexer fixes in point releases more often than people realize. Based on Apple’s iOS update history, the company has shipped search and Spotlight fixes for Messages in several recent builds. Update, restart, and the indexer typically restarts cleanly on the new firmware.
#Typical Indexing Times by Message Volume
For accounts under 5,000 messages with mostly text, indexing finishes inside 10 minutes on Wi-Fi. For accounts over 50,000 messages with heavy attachments, it can take several hours. Apple states that indexing may run for up to 24 hours in the background, and that 24-hour figure is the outer bound, not a typical wait.
A few patterns hold across most accounts:
- A library of tens of thousands of messages with several gigabytes of attachments typically finishes in well under an hour on solid home Wi-Fi.
- The same library on a slower or busier network can stretch past an hour.
- On cellular, an attachment-heavy account may never complete until you switch to Wi-Fi, after which it usually wraps up in under an hour.
If 24 hours pass without completion despite stable Wi-Fi and free storage, the issue is no longer normal indexing. It’s one of the failure modes in the next section.
#When Should You Stop Waiting and Get Help?
Five signals mean it’s time to escalate to Apple Support or a more aggressive fix instead of waiting longer.
- The indexing banner has been frozen at the same percentage for 24+ hours of charging Wi-Fi time.
- Messages crashes within seconds of opening, repeatedly, every time you launch it.
- Search returns zero results even though the indexing banner says it’s complete.
- iPhone Storage shows the Messages category bloated to 50+ GB despite normal usage.
- You see iCloud sync errors on related services like the error connecting to iCloud prompt or the Apple ID verification failed screen.
When any of those apply, Apple Support’s contact page recommends a chat session or Genius Bar appointment. Apple’s technicians can run server-side diagnostics on your iCloud Messages account that aren’t exposed in Settings.
#How to Prevent Stuck Indexing Going Forward
A few habits cut the odds of getting stuck on the indexing screen again after the next iOS update.
Keep at least 5 GB of free storage at all times. The indexer reliably stalls on devices that cross under 1 GB during a backup restore, and clearing space is often the only fix. Run Settings > General > iPhone Storage quarterly and offload apps you haven’t used in 6 months.
Keep iOS current. Apple typically ships indexer-related patches inside point releases (.1, .2, .3 versions), so the cost of waiting on iOS 17.0 when 17.4 is out is real. The same goes for major version jumps that pile up months of unfixed Spotlight bugs.
Run iCloud Messages backups before forced reboots. If your phone freezes mid-restore and you have to hold the power button, the indexer comes up confused on first boot. Keeping a recent iCloud backup means a clean re-restore is always available as a worst-case option.
#Bottom Line
Start with toggling iCloud Messages off and back on under Settings > [your name] > iCloud > Show All > Messages before doing anything else. This single step resolves most stuck cases and takes under a minute. If that fails, free up storage to at least 5 GB, stay on Wi-Fi for an hour, and only reset Network Settings if you’re past the 24-hour mark.
Avoid restoring from a backup as a first move; it’s a 1-2 hour commitment that rarely fixes an indexing issue that the iCloud Messages toggle can’t.
For related Messages problems that look similar but have different fixes:
- iPhone not receiving texts covers delivery issues.
- How to change text message to iMessage explains green-vs-blue bubble confusion.
- WhatsApp backup stuck helps if you’re seeing the same indexing-style hang in WhatsApp instead.
#Frequently Asked Questions
How long is too long for iPhone Messages indexing?
Apple says indexing can take up to 24 hours after a fresh restore or first-time iCloud Messages setup. If the progress bar hasn’t moved at all after 30 minutes of charging Wi-Fi time, treat it as stuck and start with toggling iCloud Messages off and back on.
Will toggling iCloud Messages delete my texts?
No. When you turn iCloud Messages off, iOS prompts you to download a local copy first. Tap Disable & Download Messages to keep your full thread history on the device. Your messages stay on iCloud as well, and re-enabling the toggle resyncs them.
Why is indexing so slow on cellular?
iOS throttles iCloud Messages downloads on cellular to protect your data plan, especially on plans flagged as Low Data Mode. Attachment-heavy threads can stall completely on cellular and only resume once you connect to Wi-Fi. It’s common for an account to make zero progress over hours of cellular, then finish within the hour after switching to Wi-Fi.
Does indexing run while my iPhone is locked?
Indexing pauses when the screen is locked and the device is on battery, but continues when locked and plugged in. The fastest way to finish is to plug the phone in, leave it unlocked on Wi-Fi, and avoid putting it in Low Power Mode.
Can I use Messages while it’s indexing?
Yes, sending and receiving new messages works during indexing. The only feature affected is search inside the Messages app and the Spotlight Search screen, which returns partial or empty results until the index finishes building.
Does resetting all settings erase messages?
No. Reset All Settings under General > Transfer or Reset iPhone clears Wi-Fi passwords, accessibility tweaks, and notification preferences, but does not touch Messages, Photos, or any other content. It’s safe to use as a step before a full restore.
Why does indexing restart after every iOS update?
Each iOS update can change how Spotlight stores its index, so iOS rebuilds the Messages index from scratch to stay compatible with the new search format. This is expected behavior, not a bug, and usually finishes inside an hour for typical message volumes.
Should I disable iCloud Messages permanently if indexing keeps failing?
Only as a last resort. Disabling iCloud Messages keeps everything local, which avoids the iCloud sync part of indexing but also means your messages won’t appear on your iPad or Mac. If you only have an iPhone and the recurring indexing issue is intolerable, it’s a workable trade-off, but most users get further by reporting the failure to Apple Support and waiting for a point-release fix.

iPhone 17 Cellular Data Not Working on iOS 26? 9 Fixes
iPhone 17 cellular data still dropping on iOS 26? Apple fixed the launch bug in iOS 26.0.1, but recovery failures persist. Here's the fix ladder.

iPhone Cellular Data Not Working Abroad? eSIM Fixes
Travel eSIM showing no data abroad? Fix iPhone roaming with the data-line check, Data Roaming toggle, APN settings, and network selection steps.

iPhone Cellular Data Not Working for Some Apps? 8 Fixes
Some iPhone apps refuse to load on cellular while others work fine. Check the per-app cellular toggle, Low Data Mode, VPN profiles, and Screen Time.

iPhone Stuck on EDGE? How to Get 5G or LTE Back (2026)
iPhone stuck on EDGE with crawling data? Here's why the E icon appears, which settings force 5G or LTE back, and when the problem is your carrier.