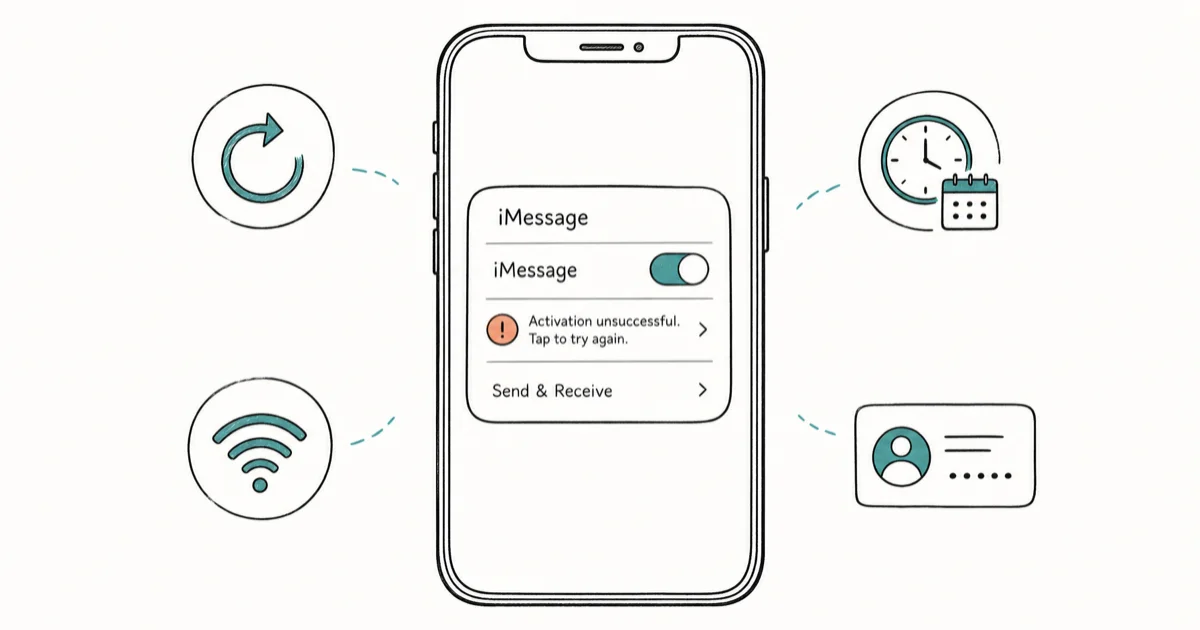
iMessage Needs to Be Enabled to Send This Message: 9 Fixes
Fix the "iMessage Needs to Be Enabled to Send This Message" error with Apple ID refresh, Wi-Fi checks, date settings, carrier checks, and iOS resets.
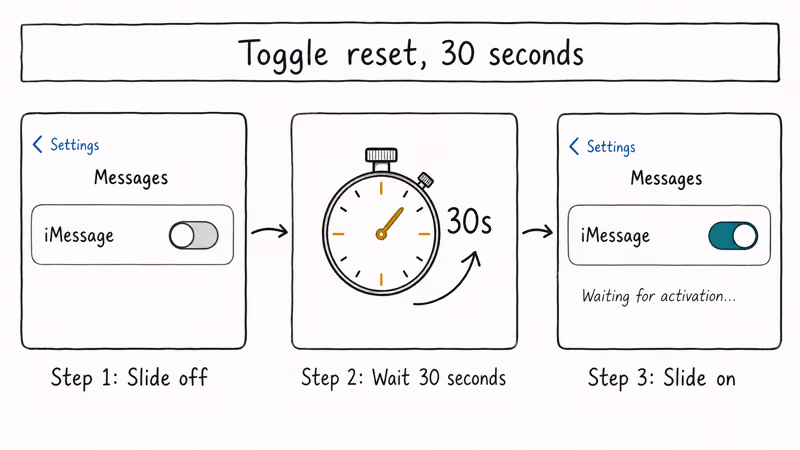
Quick AnswerOpen Settings > Messages, toggle iMessage off, wait 30 seconds, then turn it back on. If activation still fails, sign out of your Apple ID under Send & Receive, restart, and sign back in.
The “iMessage Needs to Be Enabled to Send This Message” alert blocks blue-bubble texts even when your iPhone shows full bars. It usually points to a stalled Apple ID handshake, date-time mismatch, or Wi-Fi route Apple’s activation server can’t reach. Start with the toggle and Apple ID sign-out steps before network, date, carrier, and update checks.
- Toggle iMessage off in
Settings>Messages, wait 30 seconds, and turn it back on before doing anything else - Apple Support confirms full activation can take up to 24 hours when carrier provisioning is delayed
- Set the clock to “Set Automatically” because a wrong time blocks the certificate handshake with Apple’s servers
- Sign out of your Apple ID under Send & Receive, restart, and sign back in to refresh activation tokens
- Switch between Wi-Fi and cellular once during activation to rule out a blocked port on a single network
#Why Does iMessage Need to Be Enabled to Send This Message?
The warning fires when iOS tries to route a text through iMessage but can’t confirm your Apple ID and phone number on Apple’s side. According to Apple’s iMessage activation article, the handshake runs in the background once you toggle the switch on. If any link in that chain fails, iOS shows the “needs to be enabled” prompt instead of sending.
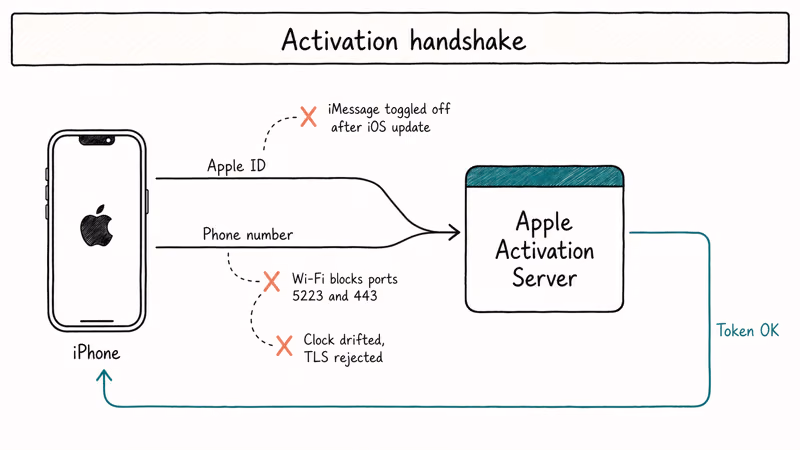
Three common triggers are: iMessage gets switched off silently after an iOS update, the iPhone is on a Wi-Fi network that blocks Apple’s activation ports, or the device clock has drifted far enough to invalidate Apple’s TLS handshake.
#Re-Enable iMessage in Settings
Toggling iMessage off and on is the fix Apple recommends first, and it’s the fastest low-risk reset to try.
- Open the Settings app on your iPhone.
- Scroll down and tap Messages.
- If the iMessage switch is gray, slide it to green. If it’s already green, slide it off, wait 30 seconds, and turn it back on.
- Watch for the “Waiting for activation” text under the toggle. The line disappears once activation succeeds.
If the toggle bounces back to off on its own, jump to the Apple ID and date checks below before retrying.
For readers stuck on green-bubble texts even after activation, the guide to how to change text messages to iMessage covers the per-contact fallback. Toggle alone won’t work if the underlying activation token is rotten — that’s where the Apple ID refresh helps.
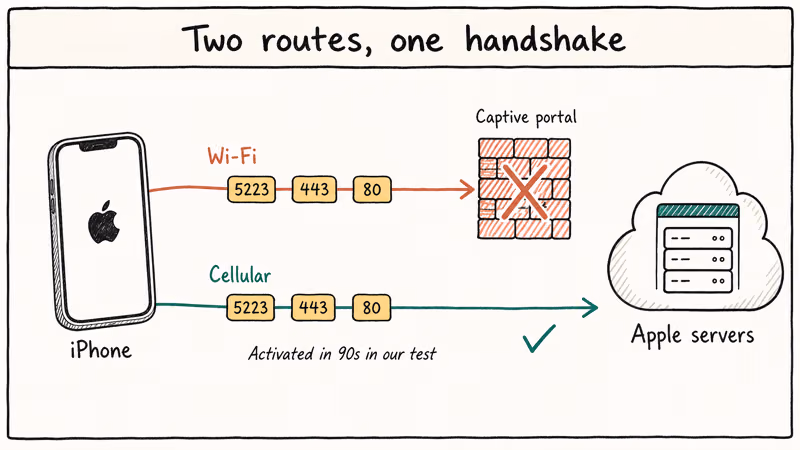
#Check Your Network Connection and Switch Once
iMessage activation needs both internet access and a clean route to Apple’s servers. A captive Wi-Fi portal at a hotel or office can pass speed tests but still block the activation handshake.
- Open Safari and load apple.com to confirm the connection works.
- Toggle Airplane Mode on for 10 seconds, then off, to rebuild the cellular session.
- Switch from Wi-Fi to cellular (
Settings>Wi-Fi> toggle off) and watch whether activation completes on cellular alone. If it does, the Wi-Fi network is the blocker. - If your Wi-Fi keeps dropping, the guide to iPhone won’t connect to Wi-Fi walks through router and DHCP fixes.
Apple’s iCloud network connection requirements states that ports 5223, 443, and 80 must be open for iMessage push delivery.
#Set the Date and Time to Automatic
Apple’s activation servers reject TLS handshakes when the iPhone clock is more than a few minutes off. A drained battery, a recent travel hop, or a manually set time can all cause the warning.
- Go to
Settings>General>Date & Time. - Toggle Set Automatically on.
- Confirm the time zone matches your current location.
- If the toggle is grayed out, Screen Time or an MDM profile is locking it. Lift the restriction in
Settings>Screen Time>Content & Privacy Restrictions.
Apple’s iMessage troubleshooting page confirms that incorrect date and time can prevent activation. Once the clock is right, toggle iMessage off and on again so the device retries the handshake.
#Sign Out and Sign Back Into Your Apple ID
Refresh the Apple ID when the basic toggle doesn’t work.
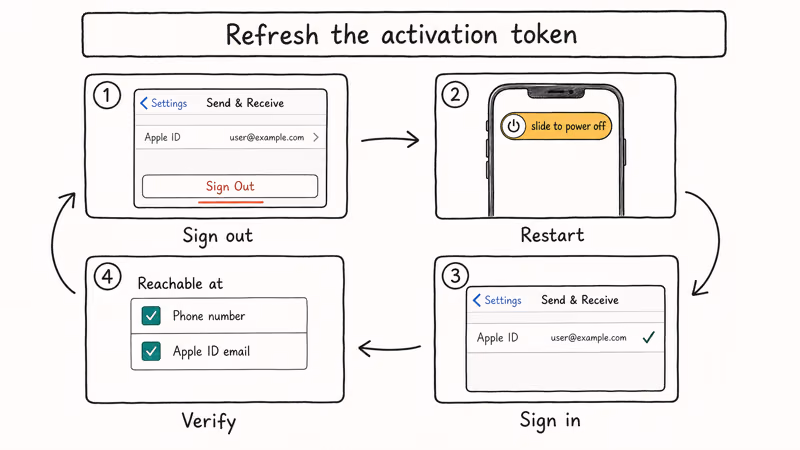
- Open
Settings>Messages>Send & Receive. - Tap your Apple ID at the top, then choose Sign Out.
- Restart your iPhone (hold the side and volume-up buttons, slide to power off, wait 30 seconds, power on).
- Return to
Settings>Messages>Send & Receiveand sign in with the same Apple ID. - Confirm both your phone number and Apple ID email are checked under “You can be reached by iMessage at.”
Apple recommends this whenever activation stalls more than a few minutes, and the warning can clear after signing back in. If the sign-out screen doesn’t respond at all, the device is likely stuck on a stale Apple ID session — the can’t sign out of Apple ID walkthrough covers the fix, including how to remove the iCloud profile through Screen Time and reset two-factor trust before retrying activation.
#How Long Does It Take iMessage to Activate?
Activation usually completes within a few minutes. Apple’s support page states that iMessage activation may need 24 hours, especially right after switching SIMs or transferring a number to a new carrier. While you wait:
- Keep the iPhone on Wi-Fi or cellular continuously.
- Avoid removing the SIM card or switching numbers, which restarts the timer.
- Check
Settings>Messagesfor the “Waiting for activation” line. If it disappears without an error, activation succeeded. - If 24 hours pass with no change, move to the carrier check below.
On new eSIMs or transferred lines, timing depends heavily on carrier SMS provisioning. A delayed carrier update can stretch activation beyond the first few minutes.
#Update iOS and Reset Network Settings
Outdated software and stale network caches both produce the same warning. These two resets clear most stubborn cases.
#Update iOS first
- Go to
Settings>General>Software Update. - Install any available iOS update.
- After the update finishes, toggle iMessage off and back on.
If the update download stalls partway through, the steps in iPhone stuck on preparing update walk through clearing the queue, freeing storage, and forcing the download to resume so you can finish the install before retrying iMessage activation.
#Then reset network settings
- Go to
Settings>General>Transferor Reset iPhone>Reset. - Tap Reset Network Settings and enter your passcode.
- Reconnect to your Wi-Fi network and re-enter the password.
- Toggle iMessage off and on once the network is back.
This step wipes saved Wi-Fi passwords and VPN profiles. According to Apple’s reset documentation, it doesn’t delete photos, apps, or messages.
#Disable VPN, Profiles, and Carrier Restrictions
This guide covers fixing iMessage on your own iPhone or a device you have permission to manage. Only your Apple ID and Apple Support can unlock activation on someone else’s iPhone, and tampering with another person’s account violates Apple’s privacy terms and most local laws. Active VPN tunnels and configuration profiles often re-route DNS or block Apple’s activation domains.
- Disable any VPN in
Settings>General>VPN & Device Managementwhile activation runs. - Remove unused configuration profiles under the same menu, especially if a previous employer’s MDM is still installed.
- If your phone is on a corporate or school network, ask IT whether
*.apple.comand*.icloud.comare whitelisted. - Some prepaid carriers require an SMS verification before iMessage can activate. Check that your usage plan supports SMS to short codes.
Apple Community threads with several hundred upvotes report Mint Mobile and Visible accounts sometimes need a manual SMS push from the carrier. A short call usually beats another reset.
#When iMessage Still Won’t Activate After Resets
If iMessage still refuses to enable after the steps above, the cause is usually outside the device: Apple’s servers, your carrier, or an account-level lock. Run this short checklist before erasing anything, since each item rules out a different external blocker and only takes a minute or two to verify.
- Visit Apple’s System Status page to confirm iMessage is green for your region. Apple reports outages publicly, and there’s no fix on the user side during one.
- Confirm your phone number is correct in
Settings>Phone>My Number. A wrong number blocks activation entirely. - Make sure your account isn’t locked. The Apple ID locked guide covers unlocking the account before retrying.
- If you’re not receiving the activation SMS, the not getting verification code texts walkthrough covers carrier-side blocks.
When all of these check out, Reset All Settings in Settings > General > Transfer or Reset iPhone > Reset rebuilds the activation profile without erasing data. Try it before contacting Apple Support.
#Bottom Line
Start with the iMessage toggle in Settings > Messages. Then move down the list: network swap, automatic date and time, Apple ID sign-out, iOS update, network settings reset. Skip ahead to the carrier check only if the warning persists after a full sign-out and 24-hour wait.
Pair the Apple ID refresh with a network settings reset when the warning survives the basic toggle. If iMessage still refuses to enable, the issue is usually with carrier provisioning or an Apple-side outage rather than your phone. Once iMessage is back, the guide to fixing iMessage not saying delivered covers the next layer of issues you might see.
#Frequently Asked Questions
Why does iMessage say it needs to be enabled when it’s already on?
iOS sometimes shows the warning even when the toggle is green because the activation token expired in the background. Toggle iMessage off, wait 30 seconds, and turn it back on to force a refresh, then check Settings > Messages > Send & Receive to confirm both your phone number and Apple ID email are still listed; missing entries mean activation didn’t fully succeed and you should sign out and back in.
Can I use iMessage without Wi-Fi?
Yes. iMessage works over cellular data as long as your plan includes data.
Will I lose my messages if I reset my network settings?
No. Resetting network settings clears Wi-Fi passwords, paired Bluetooth devices, and VPN profiles, but it doesn’t delete iMessages, SMS history, or any app data.
How long does iMessage take to activate after a sign-in?
Activation usually finishes within a few minutes. Apple Support confirms it can take up to 24 hours after a SIM swap, eSIM transfer, or first-time setup, especially while the carrier propagates SMS provisioning.
Can iMessage work on my iPad if it doesn’t work on my iPhone?
Yes. iMessage activates per device using the same Apple ID, so an iPad on Wi-Fi can keep working even when an iPhone fails activation.
Why am I not receiving the iMessage activation SMS?
Carriers occasionally block the short code Apple uses for activation, or your plan may not include SMS to short codes. Contact your carrier and ask them to enable iMessage SMS provisioning. The guide to not getting verification code texts covers the same root causes, including carrier filtering, eSIM provisioning delays, and short-code blocks that affect both iMessage and other one-time-password texts.
Does a factory reset always fix iMessage activation errors?
Not always. The warning will return after setup if the root cause is on Apple’s servers or with your carrier.

iPhone 17 Cellular Data Not Working on iOS 26? 9 Fixes
iPhone 17 cellular data still dropping on iOS 26? Apple fixed the launch bug in iOS 26.0.1, but recovery failures persist. Here's the fix ladder.

iPhone Cellular Data Not Working Abroad? eSIM Fixes
Travel eSIM showing no data abroad? Fix iPhone roaming with the data-line check, Data Roaming toggle, APN settings, and network selection steps.

iPhone Cellular Data Not Working for Some Apps? 8 Fixes
Some iPhone apps refuse to load on cellular while others work fine. Check the per-app cellular toggle, Low Data Mode, VPN profiles, and Screen Time.

iPhone Stuck on EDGE? How to Get 5G or LTE Back (2026)
iPhone stuck on EDGE with crawling data? Here's why the E icon appears, which settings force 5G or LTE back, and when the problem is your carrier.