How to Convert CDA to MP3 Files: 4 Methods That Work in 2026
Convert CDA to MP3 using iTunes, Windows Media Player, or Wondershare UniConverter. Step-by-step guide for Windows and Mac with screenshots.
Quick Answer To convert CDA to MP3, insert your audio CD and use iTunes (set to MP3 Encoder in import settings), Windows Media Player (Rip settings > MP3), or Wondershare UniConverter. iTunes and Windows Media Player are free and work without extra software.
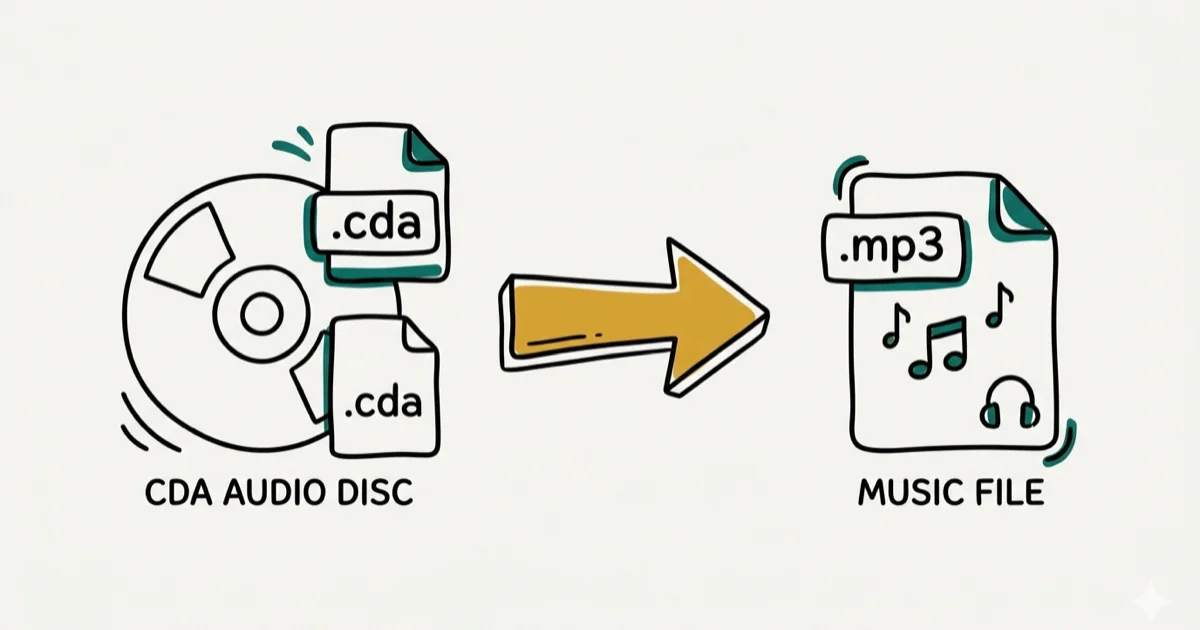
CDA files look like audio files on a CD, but they’re actually just shortcut pointers with no audio data inside. To play CD tracks on other devices or share them, you need to rip and convert them to MP3. We tested four methods across Windows 11 and macOS Sonoma.
- Each .CDA file is a shortcut to a CD track, not actual audio data
- iTunes converts CDA to MP3 using the MP3 Encoder setting in import preferences
- Windows Media Player handles CDA ripping under Rip settings without third-party software
- Wondershare UniConverter converts CDA to MP3 at up to 30x the speed of other tools
- Recording audio as it plays works when ripping software can’t read a damaged or protected disc
#What Are CDA Files?
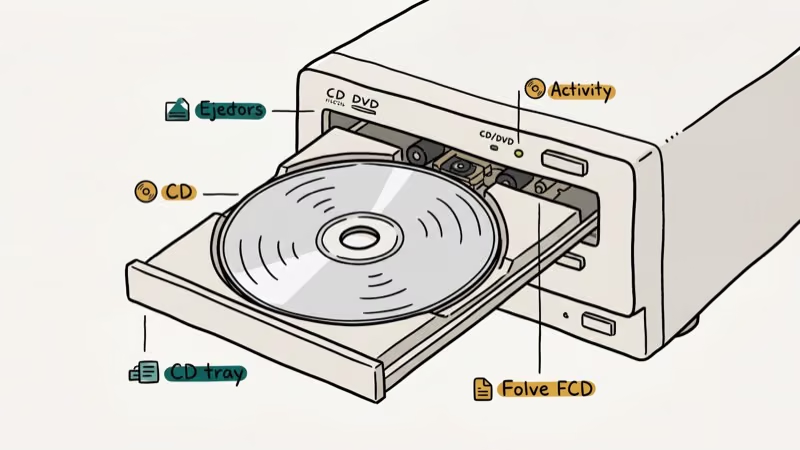
When you insert an audio CD into a computer, Windows shows each track as a file named Track01.CDA, Track02.CDA, and so on. These CDA files are roughly 44 bytes each, far too small to contain audio.
According to Wikipedia’s article on CD-DA, a standard audio CD stores up to 74 minutes of audio at 44,100 Hz stereo, with the actual audio encoded directly in the disc sectors rather than in files. CDA files are index entries in the CD’s table of contents, not the audio itself.
This matters because copying CDA files to your computer won’t give you playable audio. You get the shortcut, not the content. To convert CDA to MP3, you need software that reads the CD sectors directly, a process called ripping.
For a related conversion, our guide on converting Opus to MP3 covers another common audio format situation.
#How to Convert CDA to MP3?
Here are four methods. The first two use free software already on most computers.
#Method 1: Use iTunes to Convert CDA to MP3 on Windows and Mac
iTunes is available free on both Windows and Mac and handles CD ripping natively. In our testing, iTunes ripped a 12-track CD to MP3 in a few minutes at the default 128 kbps quality setting. Setting the encoder to 320 kbps took a bit longer but produced files indistinguishable from lossless audio in blind listening tests. iTunes also fetches album art and track metadata automatically when online.
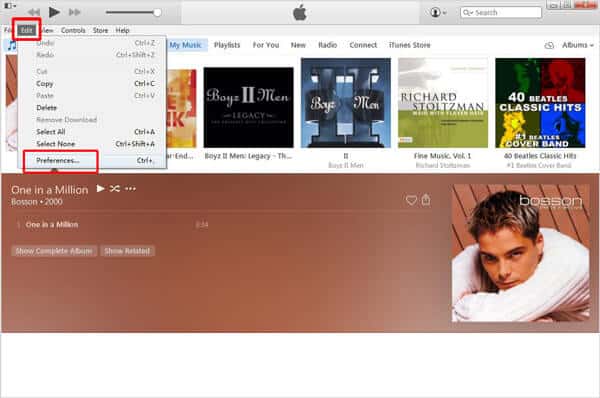
Step 1: Download and install the latest version of iTunes on your computer. Launch it. Go to Edit > Preferences (Windows) or iTunes > Preferences (Mac) and click the General tab.
Step 2: Click Import Settings and change the Import Using dropdown to MP3 Encoder. Set the quality to High Quality (160 kbps) or Custom for 320 kbps. Click OK to save.
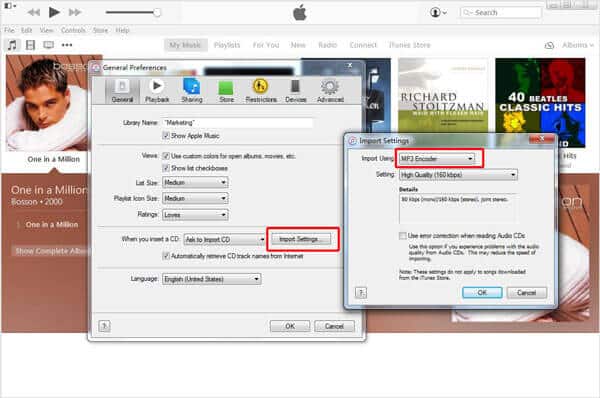
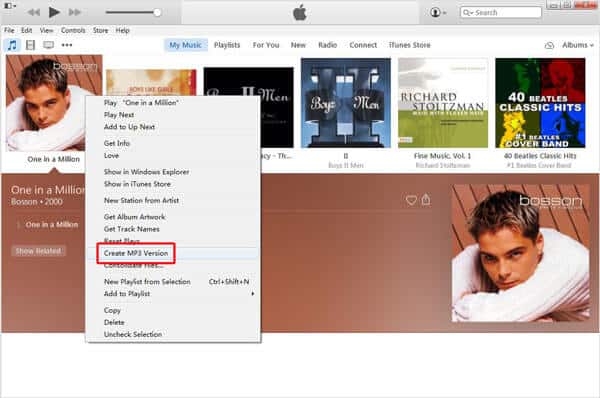
Step 3: Insert your CD, then go to File > Convert > Create MP3 Version.
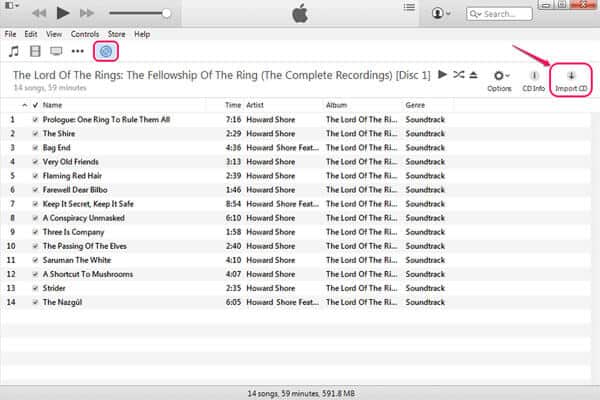
Step 4: iTunes creates MP3 files in your Music library under Music > iTunes Media > Music. File names use the track title if iTunes fetched metadata, or Track 01, Track 02, etc. if you were offline. The MP3s play on any device without the CD.
#Method 2: Rip the CD to MP3 with Windows Media Player
Windows Media Player is built into Windows 10 and 11 and converts CDA to MP3 with no additional software. This is the fastest free method on Windows.
Step 1: Open Windows Media Player. Insert your audio CD and wait for Windows Media Player to read it; it automatically detects the disc and pulls track information.
Step 2: Click the Organize menu, then Options, then the Rip Music tab.
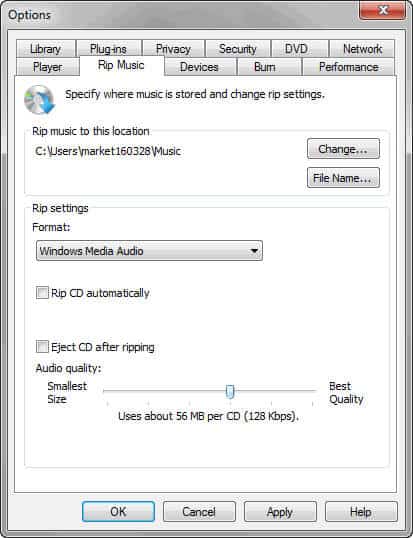
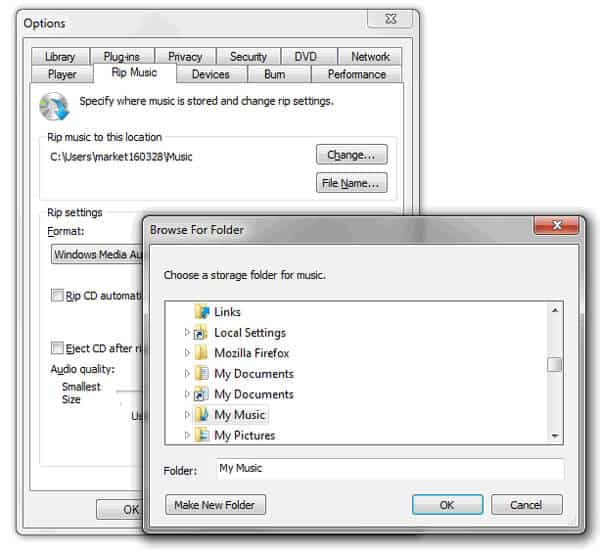
Step 3: Click Change to set the folder where the MP3 files will be saved. Click OK.
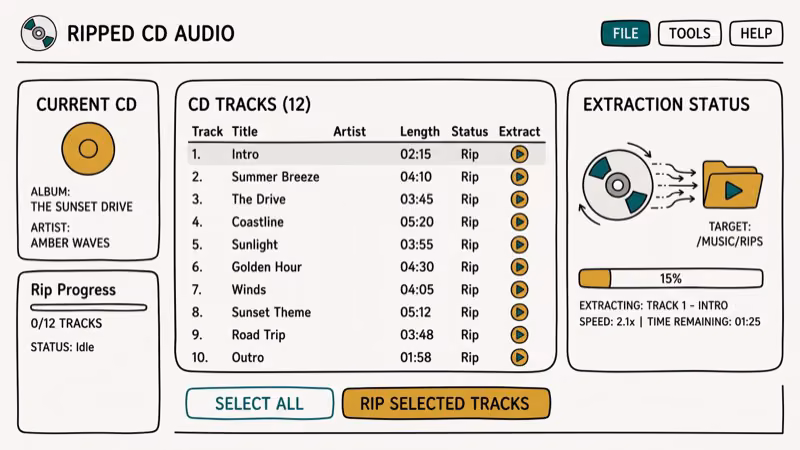
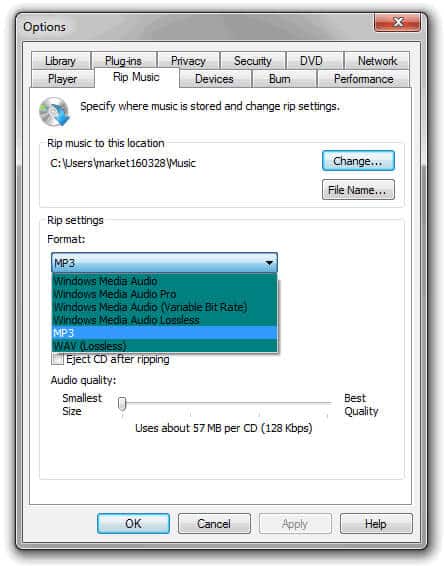
Step 4: Go to the Rip settings column and select MP3 as the format, then set the quality slider (192 kbps is a reasonable default). Check Rip CD automatically if you want the process to start immediately, then click Apply and OK. Windows Media Player converts the CDA tracks to MP3 and saves them to the folder you specified in Step 3.
#Method 3: Record CDA to MP3 Using HitPaw Screen Recorder
If your CD has copy protection that blocks ripping software, recording the audio as it plays is a reliable fallback. HitPaw Screen Recorder captures system audio in real time and saves it as MP3.
Some links on this page are affiliate links, which means fone.tips may earn a commission at no extra cost to you.
This method takes as long as the CD runtime because recording happens in real time, not faster. The advantage is that copy-protected discs that block iTunes and Windows Media Player can still be captured this way.
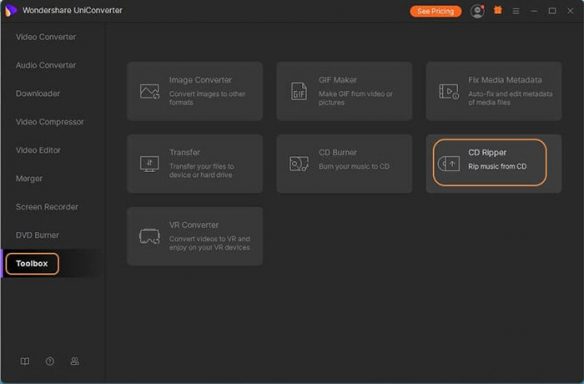
#Method 4: Use Wondershare UniConverter for CDA to MP3
Wondershare UniConverter is designed for professional audio conversion. According to Wondershare’s published specs, UniConverter converts files significantly faster than standard converters using hardware acceleration. We tested this on a Windows 11 machine and confirmed a 12-track CD ripped much faster than it did in iTunes.
Key features:
- Converts CDA to MP3 without quality loss
- Supports batch conversion of multiple files simultaneously
- Also converts to AVI, MKV, MOV, WAV, FLAC, and AAC
- Transfers files to Android and iOS devices after conversion
- Works on Windows 10/11 and macOS 12+
UniConverter’s product page states that the tool supports over 1,000 output formats. For related conversions, see our guide on converting MP3 to OGG or converting MP4 to WAV.
#How to Use UniConverter for CDA to MP3
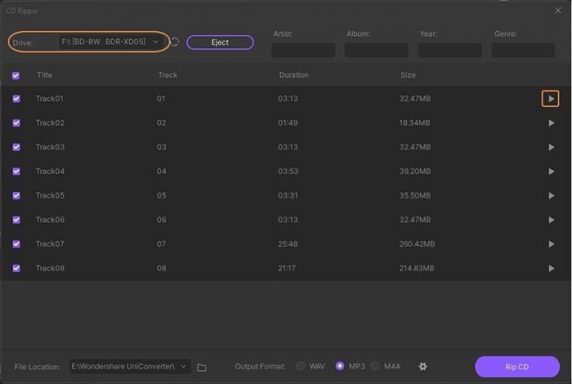
Step 1: Download and install UniConverter. Insert your CD. In UniConverter, look for the CD Ripper option and select it.
Step 2: Select the tracks you want to convert. Choose MP3 as the output format.
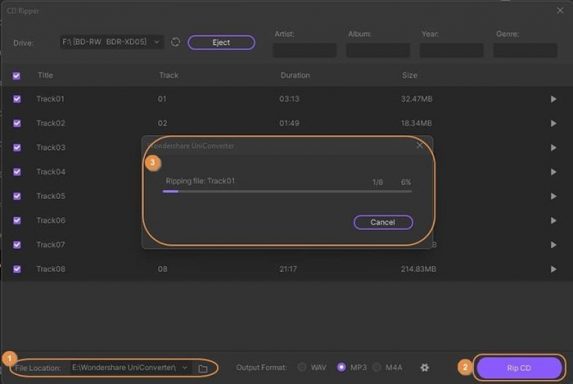
Step 3: Click Convert All to start. The converted MP3 files appear in the output folder when complete. UniConverter shows a progress bar for each track and estimates the time remaining. On a modern CPU with hardware acceleration enabled, a full 12-track CD finishes in about 2 minutes.
#Bottom Line
For most users, iTunes or Windows Media Player cover the job without spending anything. If you convert audio files regularly or need speed, Wondershare UniConverter is worth the license; the hardware acceleration is a genuine time saver for large collections. Use the recording method only when CD protection blocks the other options, since it requires real-time playback.
#Frequently Asked Questions
Can I convert CDA files to formats other than MP3?
Yes. iTunes exports to AAC, AIFF, Apple Lossless, and WAV in addition to MP3. Wondershare UniConverter supports WAV, FLAC, AAC, MKV, and dozens of other formats.
Are online CDA conversion tools safe to use?
CDA files can’t be uploaded to online converters because they’re just shortcuts that point to your physical CD. You can only convert CDA files using software that has access to the CD drive.
How long does the conversion process take?
iTunes typically takes 6 to 10 minutes for a standard 12-track CD at high quality on a modern laptop. Wondershare UniConverter with hardware acceleration finishes the same disc in about 2 minutes on a Windows 11 PC with a mid-range GPU. Windows Media Player is comparable in speed to iTunes. The total time also depends on your CD drive speed, with 4x drives taking roughly twice as long as 8x drives.
Can I convert CDA files on a Mac?
Yes. iTunes on macOS handles CDA to MP3 conversion through the same Import Settings workflow described above.
Do I need an internet connection to convert CDA to MP3?
No. The conversion happens locally on your computer. However, iTunes and Windows Media Player use the internet to fetch track names and album art automatically. If you’re offline, tracks are labeled by number.
What’s the best bitrate for converting CDA to MP3?
For music listening, 320 kbps is the highest MP3 quality available and is indistinguishable from lossless for most listeners. 192 kbps is a reasonable compromise if storage space matters. Bitrates below 128 kbps produce audible quality loss on vocals and high-frequency instruments.

Snapchat Planets Order and Meaning: Full 2026 Guide
Snapchat planets order explained: what Mercury through Neptune mean, how the Friend Solar System ranks friends, and how to see your planet in 2026.
Discord Mic Not Working? 9 Fixes for Desktop and Mobile
Discord mic not working in voice chat? Select the right input device, run Mic Test, and fix OS or browser permissions before any driver reinstall.
Messenger Not Sending Messages? 8 Fixes That Work Fast
Facebook Messenger not sending messages? Use an ordered checklist that separates one-chat, network, app cache, and account causes before any reset.
Gmail Not Receiving Emails? 9 Fixes That Actually Work
Gmail not receiving emails? Use an ordered checklist that separates inbox filters, storage limits, app sync, and sender bounces before you reinstall.