How to Remove the Filmora Watermark From Your Video
Remove the Filmora watermark by buying a license, cropping the frame, or switching to DaVinci Resolve for free, with legal options for your own videos.

Quick AnswerThe only legitimate way to remove the Filmora watermark from your own project is to purchase a Filmora license and re-export. If budget is tight, crop the watermark out of your own footage or switch to a free editor like DaVinci Resolve.
Filmora adds a visible “Filmora” watermark to every video you export on the free plan. It sits in the lower-right corner or across the frame depending on the version. You can’t hide it from inside Filmora without paying, and that is by design.
This guide covers legitimate, authorized methods only: removing the watermark from your own project on your own computer using the official Wondershare purchase method or a legitimate switch to a different editor. We don’t cover license keygens, pirated builds, or account workarounds, which are illegal and breach Wondershare’s EULA.
This guide compares five legitimate options for handling a Filmora watermark on your own project, including what works cleanly and what to avoid.
- Purchasing a Filmora license is the only clean removal method for your own project
- The free plan always watermarks every export, including the trial period
- Cropping works for corner watermarks on Filmora 11 and newer but trims roughly 5-8% of the frame
- DaVinci Resolve Free exports at full 4K with no watermark and no export cap
- Third-party scrubber tools often leave artifacts and can violate Wondershare’s EULA on paid work
#Does Filmora Add a Watermark to All Videos?
Yes. The Filmora Wikipedia entry describes the editor as a freemium product from Wondershare, meaning the free tier always writes a watermark onto the export and a paid activation removes it. There is no hidden toggle inside the app.
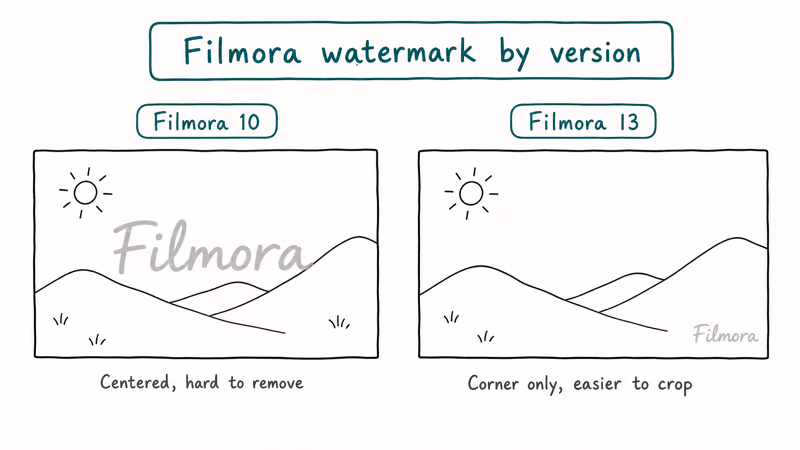
The watermark looks different across versions:
- Filmora 13 and newer: a semi-transparent “Filmora” text in the lower-right corner
- Older Filmora versions (10 and below): a large centered watermark across the entire frame
The centered watermark is much harder to remove. Corner watermarks give you more options.
#Method 1: Purchase a Filmora License
This is the only method that removes the watermark cleanly without touching your own video file. Once you buy a license and re-export your project, the output ships without a watermark.
According to Wondershare, the Individual Annual Plan lists at $49.99/year and the Perpetual Plan at $79.99 one-time (see the official Filmora pricing page for current figures). Both unlock full exports from the same app you already have installed.
To upgrade:
- Open Filmora and go to
Help>Purchase - Complete the purchase on Wondershare’s website
- Sign in with your Wondershare ID inside Filmora
Then re-export:
- Reopen your original project file (.wfp)
- Go to Export, choose your settings, and export
The re-exported file will have no watermark. You don’t need to re-edit anything. Just re-export the same project.
When to use this: If you plan to keep using Filmora, this is the right call. Re-editing from scratch in a different app takes longer than the upgrade costs in time.
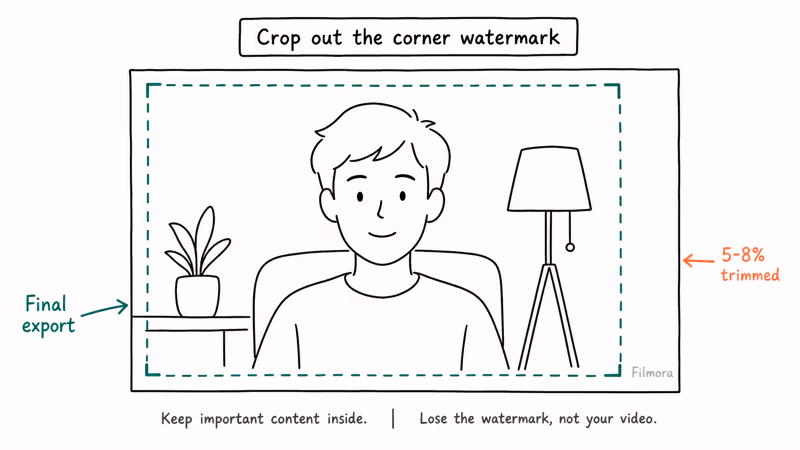
#Method 2: Crop Out the Watermark
This works only on Filmora 13 and newer, where the watermark sits in the corner. It won’t work on older versions with a centered watermark.
In Filmora itself:
- Open your project in Filmora (free version is fine)
- Select your video clip on the timeline
- Click the crop icon in the toolbar (or press Alt + C)
Then position the crop:
- Drag the crop boundary to exclude the corner with the watermark
- Keep the crop inside the frame so you don’t add black bars
- Export the video
In any other editor (if you only have the exported file):
- Import the watermarked video
- Use the crop tool to trim 5-10% off the corner where the watermark appears
Then finalize:
- Resize to fill the frame back to your original aspect ratio (16 → 16)
- Export
What you lose: 5-8% of the image in the corner. Usually unnoticeable for talking-head or centered-subject content.
#Why Is the Filmora Watermark So Hard to Remove?
Filmora embeds the watermark directly into the video frame during export. It’s rendered as part of the pixel data, not a separate overlay. That means any removal method is working against compressed video data.
According to Wondershare’s support documentation, the watermark is intentionally permanent in the exported file. There’s no metadata you can strip, no flag you can toggle, and no post-processing trick that cleanly removes it without leaving visible artifacts behind.
AI removal tools leave artifacts. The results are rarely clean enough for professional work.
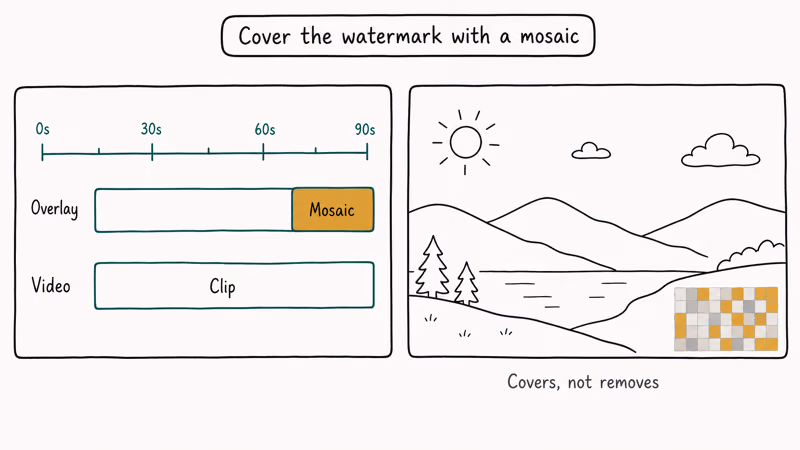
#Method 3: Use the Mosaic Blur Overlay
If you can’t crop, you can cover the watermark with a blurred box or your own logo. This doesn’t remove it, but it hides it. Useful if you need to share the video quickly.
Inside Filmora (free version):
- Go to
Effects>Utility>Mosaic - Drag the Mosaic effect onto a new track above your video
Then set the coverage:
- Resize and reposition the mosaic box to cover exactly the watermark area
- Adjust the blur intensity until the watermark is invisible
Alternatively, place a logo or solid color element over the watermark using Filmora’s Overlays panel. This approach is common for content creators who add their own branding anyway.
Limitation: The covered area is visible. It looks like a deliberate blur or overlay, which may be fine for some uses but looks awkward in others. If you’re trying to keep the video looking clean and professional, this method won’t get you there.
#Method 4: Switch to a Free Editor With No Watermark
If you haven’t committed to Filmora, switching editors eliminates the problem entirely. Several free editors export clean video with no watermark.
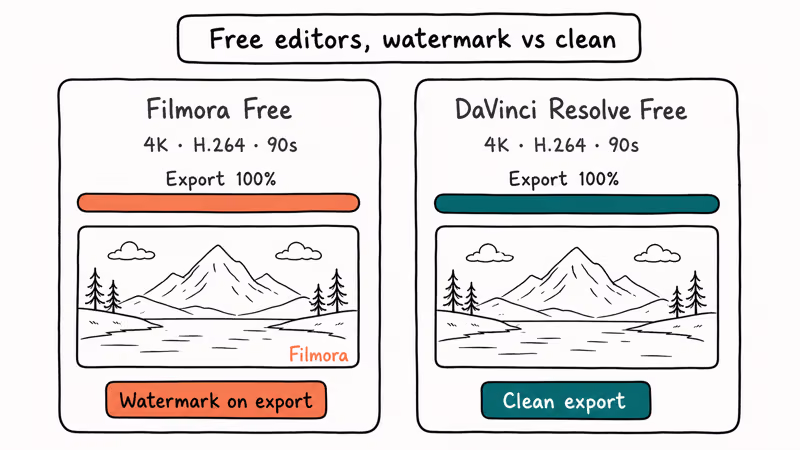
DaVinci Resolve is the most capable free option. The free version handles color grading, multi-track editing, audio mixing, and basic VFX. According to Blackmagic Design’s comparison page, the free tier has no export restrictions and no watermarks. The learning curve is steeper than Filmora, but the output is professional quality.
At equivalent H.264 bitrates, DaVinci Resolve can produce professional-quality output without adding a watermark.
OpenShot is an open-source option if DaVinci Resolve’s interface feels overwhelming. It’s simpler, available on Windows, macOS, and Linux, and exports with no watermarks. For basic cuts and transitions, it covers most needs. If you need a broader shortlist of clean alternatives, see our roundup of free video editing software with no watermark.
For converting existing Filmora project files to a workable format, the vproj to MP4 conversion guide explains how to handle Filmora’s native project format. Once you’re in DaVinci Resolve, you can also use VLC to merge video clips before importing them into your new project.
#Method 5: Use an Online Watermark Removal Tool
For a watermark already baked into a finished export, AI-powered online tools can attempt to erase it. Results vary significantly based on the watermark’s opacity and location.
Tools like Apowersoft’s online watermark remover let you:
- Upload your video
- Draw a selection box over the watermark area
Then process and save:
- Run the AI removal process
- Download the result
Reality check: AI removal commonly leaves a slightly blurred patch where the watermark was. The artifacts are easier to spot at higher resolutions and on detailed backgrounds.
This method works best when the watermark is small and the background behind it stays uniform (solid color, smooth gradient). It fails when the watermark overlaps complex motion or detailed backgrounds.
Note: This may violate Wondershare’s terms of service. Check before using for commercial work.
#Bottom Line
Start with Method 1 if you plan to keep using Filmora. The perpetual license at $79.99 is a one-time cost, and re-exporting the original project avoids quality loss. If you only need to deal with one video and don’t want to pay, crop the watermark out (Method 2). For future projects, DaVinci Resolve solves the problem permanently for free.
For help with related video tasks, the guide on removing watermarks from videos covers tools beyond Filmora, and DaVinci Resolve’s speed controls are useful once you’ve made the switch.
#Frequently Asked Questions
Can you remove the Filmora watermark without buying a license?
You can hide or work around it, but not remove it cleanly without re-editing. Cropping cuts off part of your frame, and blur overlays leave a visible patch. The watermark is baked into the exported video’s pixel data, so no software can remove it without leaving some trace.
Does Filmora’s free trial remove the watermark?
No. The free version of Filmora, including any trial period, always adds a watermark to exported videos. The watermark only disappears when you purchase a license and re-export your project from within Filmora.
What happens to the watermark if I upgrade after exporting?
Your already-exported video file still has the watermark. Upgrading doesn’t change files you’ve already saved. You need to reopen the original Filmora project file (.wfp), then re-export. If you don’t have the project file, you’ll need to use one of the workaround methods.
Is it legal to remove the Filmora watermark?
Buying a license and re-exporting is fully legal. Cropping your own video is legal too. Third-party scrubbing tools may violate Wondershare’s EULA, especially for commercial work.
Does DaVinci Resolve really have no watermarks on the free version?
Correct. Blackmagic Design’s free version of DaVinci Resolve exports at full quality with no watermarks, no export limits, and no resolution caps. The paid Studio version adds noise reduction, AI tools, and collaboration features, but for standard editing and export, the free version is fully functional.
Why does the Filmora watermark look different on some videos?
Filmora changed its watermark style between versions. Filmora 10 and earlier placed a large centered watermark across the full frame. Filmora 11 through 13 moved it to the lower-right corner as a smaller, semi-transparent text overlay. If you’re working with older Filmora exports, the centered watermark is far harder to remove than the corner version, and most cropping or blur methods won’t fully hide it.
Can I use the watermarked video for YouTube?
YouTube won’t flag or remove videos solely because of a Filmora watermark. However, a visible watermark looks unprofessional and can reduce audience trust. For personal vlogs or rough drafts, it’s often fine. For any monetized or brand content, use a watermark-free export.
Does the best video players choice affect watermark visibility?
No. The watermark is part of the video file itself, not added during playback. Any player that can render the video will show the watermark exactly as it was exported.

Apps Crashing After iOS 27 Update? Fix Order (2026)
Apps crashing after the iOS 27 update? Update the app in the App Store first, then offload and reinstall to clear stale cache, then restart. The fix order.

Do AI Translation Earbuds Work Offline? What to Know
Do AI translation earbuds work offline? A few do with downloaded language packs, but most need the cloud. Here's what works offline and what you give up.

How to Set Up Translation Earbuds (Pairing and Modes)
How to set up translation earbuds: charge, install the app, pair over Bluetooth, pick two languages, and choose a mode. A step-by-step first-use guide.

Translation Earbuds Not Translating? How to Fix Them
Translation earbuds not translating? Usually it's the app, the internet, or the language settings. Here's how to fix pairing, sound, and lag fast.