When your iPhone screen is cracked, shattered, or completely unresponsive, entering your passcode becomes impossible through normal touch. This guide covers every method to unlock your device — from quick fixes for minor unresponsiveness to full restores for severely damaged screens.
- A force restart should always be your first step — it fixes many software-related screen freezes and does not erase any data on the device
- The Siri plus VoiceOver method lets you unlock the iPhone hands-free without any extra hardware, and works on iOS 11 and later
- Connecting a Lightning-to-USB keyboard adapter lets you type your passcode on a physical keyboard, bypassing the broken touchscreen entirely
- Using iCloud Find My to remotely erase the device is an option when nothing else works, but requires Find My to have been enabled and the device to be online
- iTunes or Finder Recovery Mode restore wipes the iPhone completely, so confirm you have a recent backup before using this as a last resort
#First: Determine the Problem
Before trying unlock methods, identify what you’re dealing with:
- Software glitch (screen freezes, doesn’t respond to touch): Try a force restart first — this often fixes temporary unresponsiveness without data loss
- Partial damage (some areas still work): You may be able to use VoiceOver or reposition the passcode entry
- Complete hardware failure (no touch response at all): You’ll need an external input method or remote unlock
#Try a Force Restart First
A force restart fixes many software-related screen issues and doesn’t erase data:
- iPhone 8 and later: Press Volume Up, then Volume Down quickly, then hold the Side button until the Apple logo appears
- iPhone 7/7 Plus: Hold Side + Volume Down for 10+ seconds until the Apple logo appears
- iPhone 6s and earlier: Hold Home + Top/Side for 10+ seconds until the Apple logo appears
If the screen works after restarting, the issue was a software glitch. If not, continue with the methods below.
#Method 1: Siri + VoiceOver
The most accessible method — no hardware or computer needed:
- Activate Siri by holding the Home button (older models) or Side button (iPhone X+)
- Say “Turn on VoiceOver”
- Swipe left or right to navigate to the passcode field (VoiceOver reads each element aloud)
- Double-tap to select each digit of your passcode
- Once unlocked, say “Turn off VoiceOver” to return to normal
Works on: iOS 11 and later. Requires Siri to be enabled (Settings → Siri & Search).
#Method 2: External Keyboard
Connect a physical keyboard to bypass the touchscreen entirely:
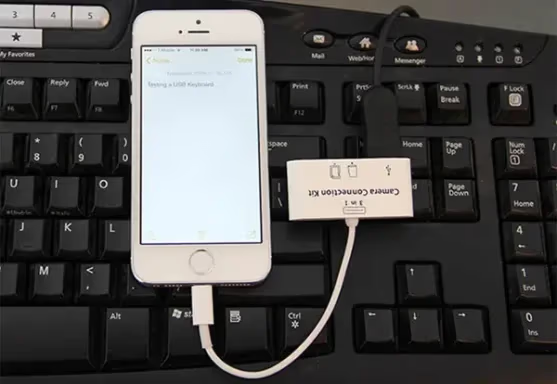
- Get a Lightning-to-USB adapter (or USB-C for iPhone 15+)
- Plug in a standard USB keyboard
- Press the space bar twice to wake the lock screen
- Type your passcode and press Enter
Best for: iOS 11.4 or earlier. On newer iOS versions, you may need to “trust” the accessory first, which requires screen interaction.
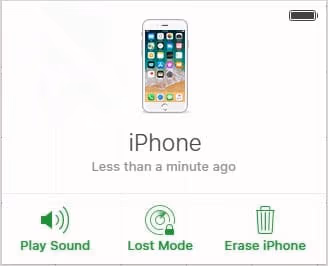
#Method 3: iCloud / Find My iPhone
Erase and unlock remotely — no physical interaction with the device needed:
- Go to iCloud.com/find on any browser
- Sign in with your Apple ID
- Select your iPhone → click Erase iPhone
- After the erase completes, set up the device fresh or restore from backup
Requirements: Find My iPhone must be enabled, and the device must be online (Wi-Fi or cellular).
This erases all data. Make sure you have a backup — if the computer was previously trusted, you can still back up via iTunes/Finder even with a broken screen.
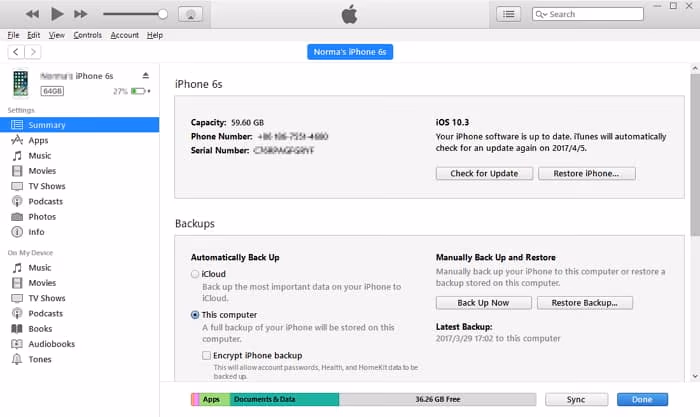
#Method 4: iTunes / Finder Restore
Connect to a computer and restore through Recovery Mode:
- Open iTunes (Windows/older Mac) or Finder (macOS Catalina+)
- Connect the iPhone via USB cable
- Enter Recovery Mode using the button combo for your model:
- iPhone 8+: Volume Up → Volume Down → hold Side button
- iPhone 7: Hold Side + Volume Down
- iPhone 6s and earlier: Hold Home + Top/Side
- Click Restore when prompted
- Wait for the restore to complete, then set up the device
This erases all data and removes the passcode.
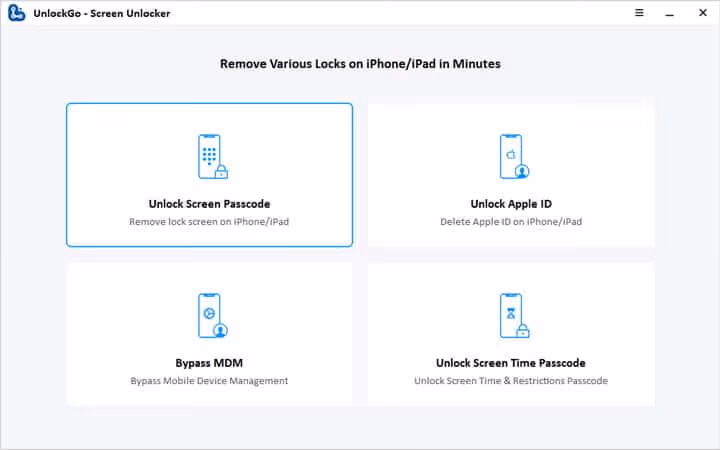
#Method 5: Third-Party Unlock Software
Tools like Tenorshare 4uKey and iToolab UnlockGo can guide you through the unlock process with a visual interface:
- Download and install on your computer
- Connect the iPhone via USB
- The software walks you through entering Recovery/DFU Mode
- It downloads firmware and restores the device automatically
These tools are particularly useful when you can’t see the screen at all to follow manual Recovery Mode instructions.
#Method 6: Professional Screen Repair
If you want to keep your data and avoid erasing:
- Visit an Apple Store or Apple Authorized Service Provider
- Screen repair costs vary by model ($149–$379 without AppleCare+)
- Repairs under AppleCare+ have a lower deductible ($29–$99)
- After repair, you can unlock normally with your passcode
This is the only method that preserves your data without requiring a prior backup.
#Preventive Measures
- Use a quality screen protector — tempered glass prevents most cracks
- Use a case with raised edges — protects the screen on face-down drops
- Enable iCloud backup — ensures you have a recent backup if you ever need to erase
- Set up Face ID/Touch ID — biometric unlock works even with minor screen damage
- AppleCare+ — significantly reduces repair costs for accidental damage
#FAQs
-
Can I unlock without losing data? Methods 1 (Siri), 2 (keyboard), and 6 (screen repair) preserve your data. All other methods erase the device.
-
Will Apple unlock my iPhone if the screen is broken? Apple typically recommends repairing the screen first. They won’t bypass the passcode for you.
-
How can I back up with a broken screen? Connect to a previously trusted computer — iTunes/Finder can back up without screen interaction. If the computer was never trusted, you’ll need screen access to approve the trust prompt.
-
Is third-party unlock software safe? Reputable tools like 4uKey and UnlockGo are safe. Avoid free tools from unknown sources — they may contain malware.
-
Can I replace the screen myself? Possible, but not recommended — it’s complex, voids your warranty, and risks further damage. Professional repair is safer.
For general iPhone lockout solutions (forgot passcode, disabled device), see our complete locked out of iPhone guide.